Bloggers: Quit Using CAPTCHAs

compilation of various captchas

A brief public service announcement: if you're a blogger, please don't require your readers to enter a "CAPTCHA" before leaving a comment (those almost illegible words to prove you're not a spambot). Writer and blogger Julie Hedlund explains why in her excellent post, In a nutshell:
  • You don't need it (Blogger & Wordpress have good spam filters)
  • You may lose comments and readers
  • Your blog will seem less professional


The key to providing a good experience at a blog is reducing friction, and requiring someone to verify they are human or moderating comments before they go live are all slight barriers that create friction. Awhile ago, I had disabled my CAPTCHAs in my old Blogger interface, but when I switched over the newer interface, the CAPTCHA setting was added back as a default. So double check your settings.  

P.S. Here are two things I find interesting about CAPTCHAs:

  • CAPTCHA stands for "Completed Automated Public Turing test to tell Computers and Humans Apart." As Wikipedia points out, CAPTCHAs are actually reverse Turing tests, as Turing tests are given by humans to determine whether a machine is a human, while CAPTCHAs are given by a machine to determine whether a human is a machine. 
  • Sometimes the fake words that are generated are pretty good....
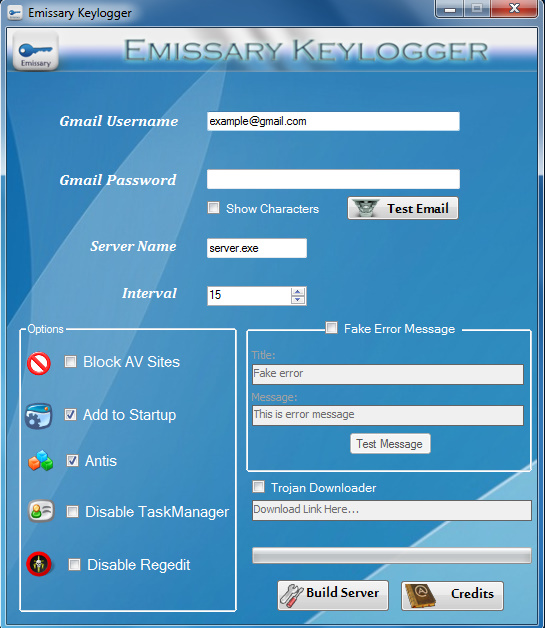
HOw to Hack Any Computer, Account and anything By USing EMissary KEylogger.

Hello friends lets start learning how to hack. Today i am going to share a keylogger which used to hack others pc. Just you have to make your virus file and send it your enemy’s pc. This keylogger will monitor your enemy’s every keystroke and send it to your email address.


Image

  1. first u must have the emissary keylogger in ur system. and Net Framework installed bcoz keyloggers wont work without this.
  2. then u have 2 create fake account at google. its use is this when u hack a person his  data will be mailed to ur account.
  3. ok when u do these 2 Now open the the Emissary Keylogger.
  4. their you can see Gmail User Name. and below it Gmail Password. PUt the gamil account with password their . Bcoz  this will confrm itslef that the mails have 2 sent for ths account or not..
  5. when u put their u can see Test Mail.. just click on it . it will be blink for a minute and then a window will appear and saying "Message has sent. Check your mail." then check ur mail is their a msg recieved from the emissary. if not then try again bcoz u hv enterd the pass or id wrong.
  6. After it below u can see Server Namme in the bracket will be written "sever.exe" well u can change the name like Nav.exe..NOTe  u can only change server but not .exe  e.g..  NAv.exe.
  7. Below that is Interval .. IT means that what u want in how much minutes the mail come to u from the victms pc. i like to give it 3 bcoz this is gud.
  8. At the End u can see  Build Server. just click on it and i file will apear at ur system by then name u have given in server name . and it will be at the same directory where the emissary keylogger is..
  9. NOW the file is created with u.. Give that file to the victm who u want to hack If he OPens it then he will be hacked..
  10. If u are worried how can i gave them . Then post it to the free web hosting space like www.mediafire.com


    To download this software 

    Please not that do not use this software for hacking. Its for learning how to hack

    Html Editor

    HTML Editor
    My Blogger Tricks

    CSS Web Colour Chart

    Embeddable css color chart
    Below is an embeddable Web Colour Chart most probably known as hexadecimal colour chart. The chart below consists of a total 216 hexadecimal colours which are well interpreted by all browsers and are compatible in every sense. The Colour chart below uses a combination of well scripted HTML and CSS to produce a mouse over effect when you hover your cursor over the table cells. You can use this chart for both free and commercial purpose. You can use these colour codes/hexadecimal values for editing your Blogspot, Wordpress or web templates. They are web safe colours so they look the same in any browser.


    CSS Web Colour Chart
     
    #FFFFF #FFFFCC #FFFF99 #FFFF66 #FFFF33 #FFFF00
    #FFCCFF #FFCCCC #FFCC99 #FFCC66 #FFCC33 #FFCC00
    #FF99FF #FF99CC #FF9999 #FF9966 #FF9933 #FF9900
    #FF66FF #FF66CC #FF6699 #FF6666 #FF6633 #FF6600
    #FF33FF #FF33CC #FF3399 #FF3366 #FF3333 #FF3300
    #FF00FF #FF00CC #FF0099 #FF0066 #FF0033 #FF0000

    #CCFFFF #CCFFCC #CCFF99 #CCFF66 #CCFF33 #CCFF00
    #CCCCFF #CCCCCC #CCCC99 #CCCC66 #CCCC33 #CCCC00
    #CC99FF #CC99CC #CC9999 #CC9966 #CC9933 #CC9900
    #CC66FF #CC66CC #CC6699 #CC6666 #CC6633 #CC6600
    #CC33FF #CC33CC #CC3399 #CC3366 #CC3333 #CC3300
    #CC00FF #CC00CC #CC0099 #CC0066 #CC0033 #CC0000
     
    #99FFFF #99FFCC #99FF99 #99FF66 #99FF33 #99FF00
    #99CCFF #99CCCC #99CC99 #99CC66 #99CC33 #99CC00
    #9999FF #9999CC #999999 #999966 #999933 #999900
    #9966FF #9966CC #996699 #996666 #999933 #999900
    #9933FF #9933CC #993399 #993366 #993333 #993300
    #9900FF #9900CC #990099 #990066 #990033 #990000

    #66FFFF #66FFCC #66FF99 #66FF66 #66FF33 #66FF00
    #66CCFF #66CCCC #66CC99 #66CC66 #66CC33 #66CC00
    #6699FF #6699CC #669999 #669966 #669933 #669900
    #6666FF #6666CC #666699 #666666 #666633 #666600
    #6633FF #6633CC #663399 #663366 #663333 #663300
    #6600FF #6600CC #660099 #660066 #660033 #660000

    #33FFFF #33FFCC #33FF99 #33FF66 #33FF33 #33FF00
    #33CCFF #33CCCC #33CC99 #33CC66 #33CC33 #33CC00
    #3399FF #3399CC #339999 #339966 #339933 #339900
    #3366FF #3366CC #336699 #336666 #336633 #336600
    #3333FF #3333CC #333399 #333366 #333333 #333300
    #3300FF #3300CC #330099 #330066 #330033 #330000

    #00FFFF #00FFCC #00FF99 #00FF66 #00FF33 #00FF00
    #00CCFF #00CCCC #00CC99 #00CC66 #00CC33 #00CC00
    #0099FF #0099CC #009999 #009966 #009933 #009900
    #0066FF #0066CC #006699 #006666 #006633 #006600
    #0033FF #0033CC #003399 #003366 #003333 #003300
    #0000FF #0000CC #000099 #000066 #000033 #000000


    Web developers and bloggers are requested to attach a link-back to this blog if they wish to share this chart with their readers.

    Here how to add metakeywords to your blog


    Keywords in Blogger Posts


    As we known, meta keyword is one important way to optimize your website search ranking. Search engines use meta keyword to filter sites for the search result of querry occured by their search tool. If your keywords is bad, click rate of your site in search result low, your rank will be lower, lower and may be banned out of the list. So, is meta-keyword important?

    For blogger users, the question is how to add meta keyword to ours blog? Ya. The answer is:

    1. First, sign in to blogger; at Dashboard, click "Layout" tab; then click "Edit HTML".
    2. Find this line of code :

    <b:include data='blog' name='all-head-content'/>

    You could press Ctrl+F to use "Find" function of your browser.

    3. Copy three line below and paste after the line we found at step 2.

    <meta content='DESCRIPTION' name='description'/>
    <meta content='KEYWORDS' name='keywords'/>
    <meta content='AUTHOR' name='author'/>

    4. Replace the words in red with your appropriated content.

    Now your could view your blog and check your meta tags at the page source ( in your browser, click View/Source(Page Source) ).

    How To Restore Blogger From Backup

    This is an open Internet, bad things can happen to anyone even to the professional bloggers. This is why we spend most of our time in reminding you to take a backup of your blogger blog on a regular basis. No matter how secure framework you got.  Though, we have already explained you various methods of taking backup of your blogger blog. Recently, a guy contacted us and asked us How to restore Blogger From Backup? This question was reasonable because we haven’t covered this topic yet. Therefore, in this tutorial, we will show you How to restore Blogger From Backup?


    Why to Restore Blogger From Backup?

    Before we work on our tutorial, it is essential for everyone to learn why he should be restoring his blog through Backup. Following are the few meaningful reasons we collected while experiencing blogger for more than 5 years.

    • Blog Deleted by Blogger: Your blog is owned by Google which means you are not the lone administrator of you site, so Blogger can delete your blog if you violated the content policy. In this situation, you may not get your .blogspot.com site back, but if it is hosted on .com domain, then you might have chances of recovering it. If not on Blogger, then with the help of the backup you can restore it on WordPress.
    • Hacked or Malware: Sometime websites catch malware attack. Most people are not code-friendly, so they cannot remove the malware or the hacking script injected into their site. In this situation, they can use the backup to restore their site to the normal conditions.  
    Still these reasons are limited to some extent because it could be anything that we may have not experienced it yet. If anyone has something to share, then feel free to share it by commenting below.

    How to Restore Blogger From Backup?

    The first thing you need to do is to login into your Google account. Now from the Blogger dashboard go to Your Blog >>Settings >> Other >> Import. For your help, we have attached a screenshot below:
    Now you need to upload the backup of your site so that system can restore your site. Just Choose the backup from your computer hard drive, enter the captcha for security reasons and press the “Upload” button as it can be seen on the screenshot below.
    Congratulations: once the backup is finished, you have successfully backup’d your blogger site. The old articles and comments can be accessed either your blogger dashboard or your site.

    Newer Posts Older Posts
    © Copyright Downloads free zone
    Back To Top